
This blog began in 1997 as a single news page called Nucelus. In 2005, during a long wait to move into a new house, I decided to learn some php and MySQL and write my own blogging system, which became inkyBlog and which now powers this, my own Webbledegook blog.
Thank you to my brother, Murray Ewing, for help with some of the more challenging aspects!
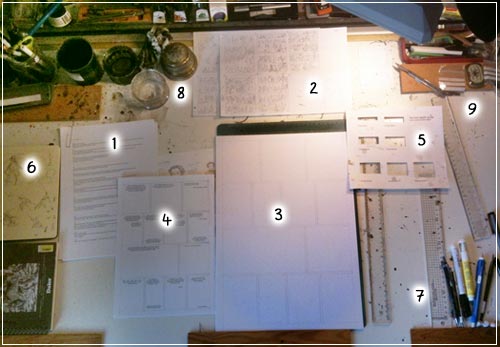
1) Script. I tend to plot out the story in a notebook and then type it up. I use Scrivener to type up and revise my notes and final scripts.
2) Thumbnails. These are usually sketched out as I script and are used to rough out the page layout and general composition of panels. Very rough!
3) Master artboard. I use A3 Goldline Bristol Board. Here you can see all the panels ruled out for this page. All I have to do now is simply fill in each box with a complete drawing ... easy!
4) Lettering guide. I scan in the empty-panelled artboard (3), put on the lettering in Photoshop, and print it out so I know how much room each speech balloon will take up. If I have more time I sometimes draw a second set of roughs on this sheet as well, but often the thumbnails (2) are enough.
5) Ballon guide. Each of those cut out square corresponds to the space a different size speech balloon will take up - 2 lines, 3 lines, 4 lines etc., as dictated by (4). I use it to mark out the space on the master artboard (3) so I know how much room they will take up in the panel.
6) Sketchbook. This is where I will work out difficult poses and compositions etc.
7) Tools. This is where I keep in-use pencils, pens, erasers and rulers. I use a clutch pencil with an H or HB lead for drawing the first stage of the finished art. I use an Edding 8404 Aerospace marker for most straight (ruled) lines, including panel borders (this is also the pen I use for sketching at conventions). As well as block erasers (usually a Pentel Hi-Polymer) I also have an ultra-fine eraser 'pen' (currently a Tombo).
8) Ink. Just above the number (8) you can see my inkwell - an antique brass holder with a hinged lid containing a ceramic well-pot (ceramic is easy to clean). I refill it regularly from a large 250ml bottle of Winsor & Newton black India Ink. On the far right of the number you can just see a tin pen-tray where I keep my dip pens. I have recently changed from using a Hunt 107 nib to a Hunt 102. There are also two or three water receptacles, for black ink and for coloured inks and an old jam jar with an assortment of pens and brushes - I use the brushes for solid black areas on the art (mostly a Royal Soft Grip SG 250 no.2).
9) Nibs. Above the number (9) is a little tin box for new nibs (Hunt 107 and 102), a scalpel, and another tin tray of various pens, spare pencils, pencil leads (H and HB), sharpeners and extra erasers.
Not numbered, along the top, are additional items such as coloured inks, reserves of India ink, compass, dividers, stapler, glue, and various shape guides (flexi-curve, circle stencil, etc.). I have a small low table next to my art desk where I stack in-use reference books (often piling up on the floor as well).
![]()